

Insert breaks, images, and property lists
Sometimes what you need to add to a scene isn’t words. It’s a chapter break. An image. A clean line across the page. Or a tidy block of character stats that lines up name against detail.
Dabble keeps all of that behind one small button that appears right where you’re already typing. No trip to a menu bar, no leaving the sentence you’re in.
It’s called the plus menu, and it lives on your blank lines.
We’ll cover:
- Open the plus menu: the (+) that appears on a blank line
- What you can insert: breaks, scenes, images, dividers, and more
- Property lists: two-column notes for stats and glossaries
Open the plus menu
Section titled “Open the plus menu”The plus menu shows up on an empty line, in the left margin of the editor.
- Click into a blank line in your scene, so your cursor sits on an empty paragraph.
- Move your pointer to the left edge of that line. A (+) button appears in the gutter.
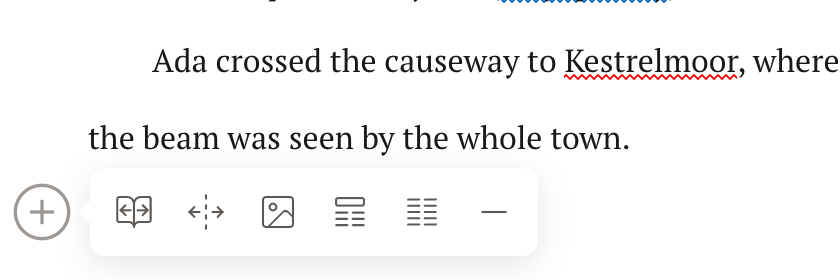
- Click the (+). A small toolbar of insert options opens.
- Click an option to drop it in at that line.
What you can insert
Section titled “What you can insert”The plus menu gathers the editor’s insert actions in one place. Here’s what each one does.
- Start a new chapter. Breaks your manuscript into a fresh chapter at this point, the same move as Split the chapter here. See Split and merge scenes and chapters.
- Start a new scene. Splits the current scene in two, matching Split the scene here from that same article.
- Insert an image. Drops a picture inline right at the cursor. See Add images to your manuscript for sizing and captions.
- Insert a property list. Adds the two-column notes block described below, and there’s a matching option for its heading.
- Insert a divider. Draws a horizontal rule across the page, handy as a visual scene break between passages.
The exact icons and their order can shift as Dabble grows, so if you’re not sure which is which, hover an icon to see its tooltip.
Property lists
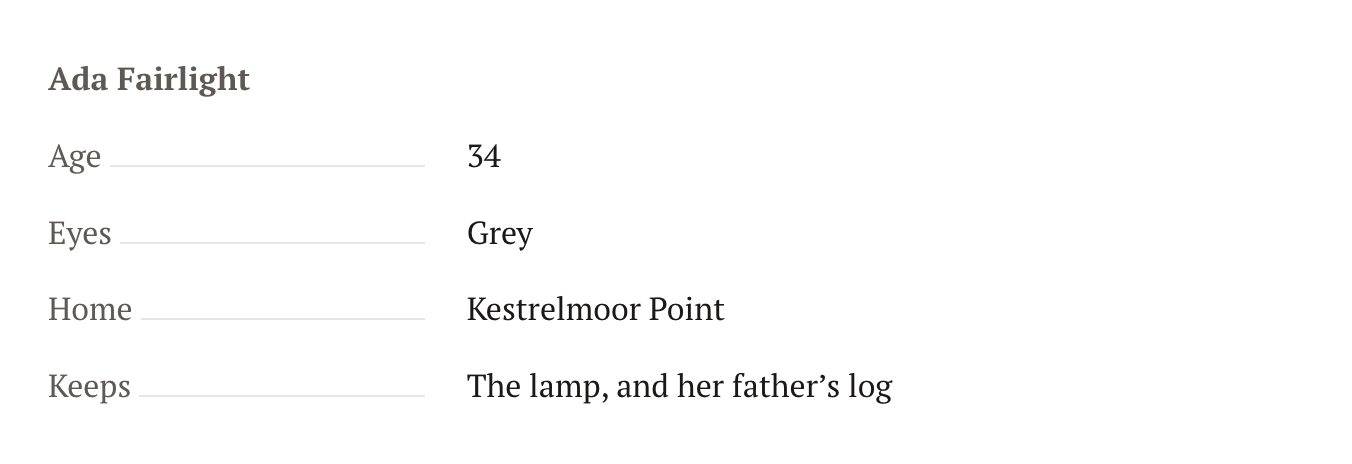
Section titled “Property lists”A property list is a two-column layout that pairs a label with its value. Think Age: 34, Eyes: green, Home: Longbourn, each on its own row, all lined up.
It’s built for the kind of notes that come as facts rather than prose: a character stat block, a glossary of invented terms, a quick reference for a place or an object. Your labels sit in one column, your details in the other, so the whole block stays scannable.
There are two block styles that work together:
- Property List is the block itself, the rows of label-and-value pairs.
- Property List Heading is a heading style that sits above the block, so you can title it (for example, “Elizabeth Bennet”).
Create a property list
Section titled “Create a property list”You have two ways in.
- From the plus menu. On a blank line, open the plus menu and choose the property list option (or its heading).
- From the Formatting Toolbar. Put your cursor in a paragraph, open the block-type menu on the left, and choose Property List or Property List Heading. See Format text in your manuscript for how to show that toolbar.
Fill in a property list
Section titled “Fill in a property list”Once the block is in, you fill it like a small spreadsheet.
- Type the label (the term), such as Age.
- Press Tab to jump to the value column, and type the detail, such as 34.
- Press Enter to start a new row and type the next label.
- Press Shift+Tab to move back from a value to its label.
- Press Enter on an empty label to leave the list and return to normal paragraphs.
Property lists shine in your story notes, especially character files. See Characters and casts for where those notes live.