

Check spelling and grammar
You know the typo is there. Your eyes just skate right past it every time. Good news: you can check spelling and grammar in Dabble as you write, and it underlines anything worth a second look so you catch the slip before a reader does.
This doc covers turning the checks on, fixing what gets flagged, building your personal dictionary, and setting the language Dabble checks against.
We’ll cover:
- Turn on spell check: the free red-underline check, on in one click
- Turn on grammar and style (paid): green and blue underlines for the paid check
- Fix an issue: swap in a suggestion, dismiss it, or teach Dabble the word
- Manage your dictionary: see and prune the words you’ve added
- Change the checking language: set it per project, account-wide, or on every project at once
Before you begin
Section titled “Before you begin”Two checks, two different tiers.
- Spell Check is free and available to everyone.
- Grammar (which covers grammar and style together) is a paid feature. If your plan doesn’t include it, the Grammar menu item won’t appear.
- Both checks are off by default, and both live on your account, so once you turn them on they follow you across your devices.
- Checking is powered by ProWritingAid, but it all happens inside Dabble. Nothing extra to install.
Turn on spell check
Section titled “Turn on spell check”Start with the free one. It’s a single click.
- Open a project, then open a document so the editor is showing.
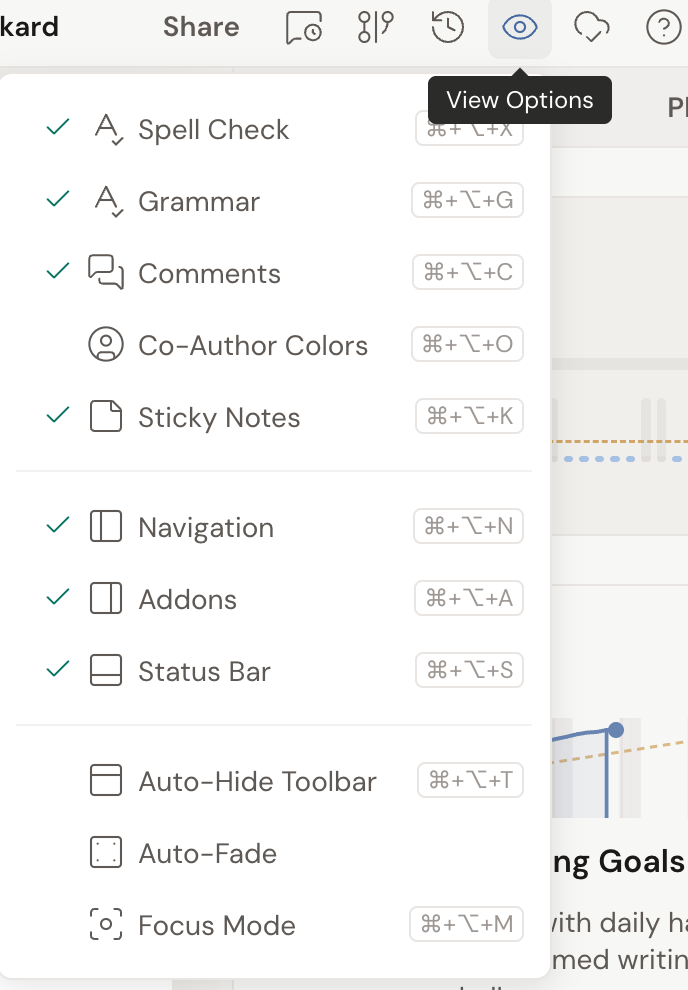
- In the header, click the eye icon to open View Options.
- Click Spell Check, or press Cmd+Option+X (Mac) or Ctrl+Alt+X (Windows).
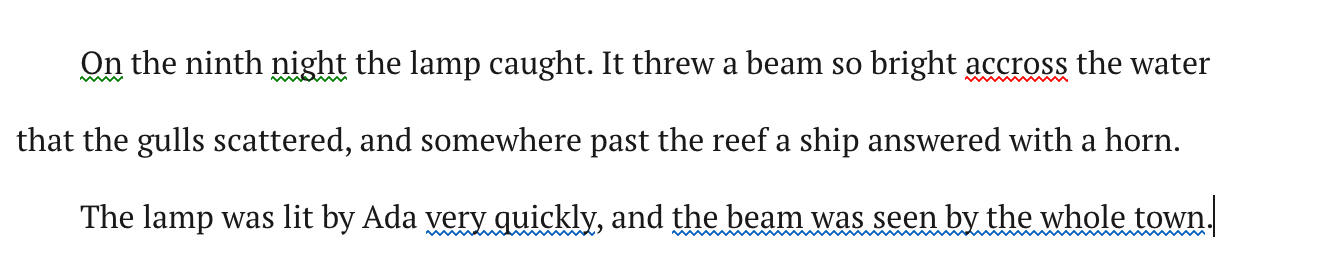
- Misspelled words get a red wavy underline as you write.
Turn on grammar and style (paid)
Section titled “Turn on grammar and style (paid)”Grammar and style come as a pair, and they’re the paid check.
- In View Options, click Grammar, or press Cmd+Option+G (Mac) or Ctrl+Alt+G (Windows).
- Grammar issues get a green wavy underline. Style suggestions get a blue wavy underline.
If you don’t see Grammar in View Options, it isn’t part of your current plan.
Fix an issue
Section titled “Fix an issue”Every underline is a flag, not a verdict. You decide what happens next.
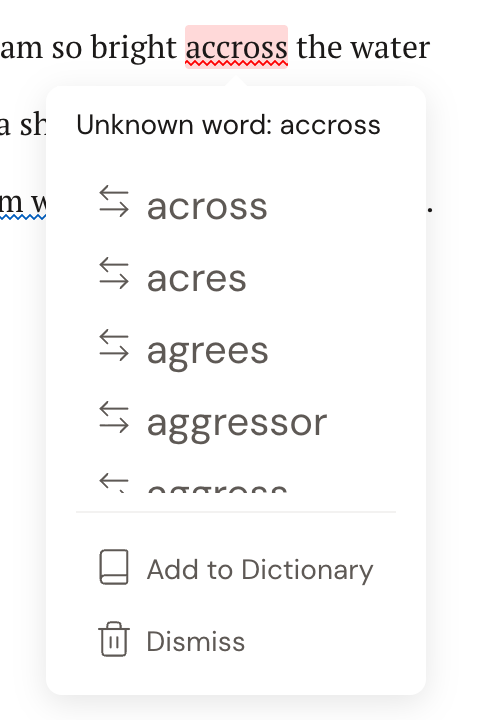
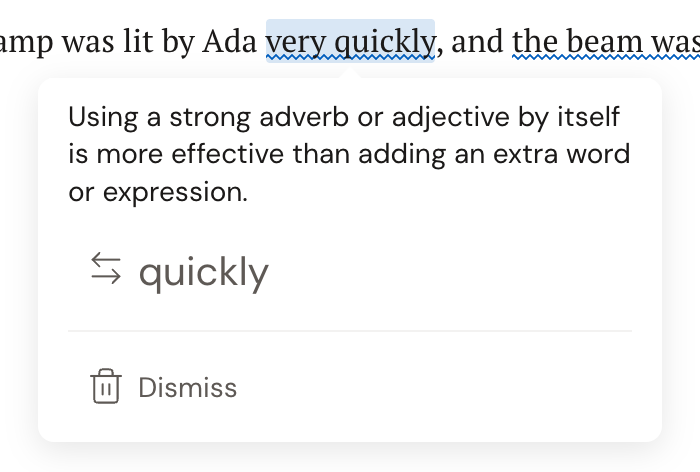
- Hover over any underlined word or phrase. A small popover opens.
- The popover opens with the reason. A spelling issue reads Unknown word: {the word}. A grammar or style issue explains the rule instead, like “Using a strong adverb or adjective by itself is more effective than adding an extra word or expression.”
- Below that is the list of suggestions. Click one to swap it into your text. Dabble matches the original capitalization and changes only the characters that differ, so it works smoothly with Track Changes.
- To leave the text as it is, click Dismiss (the trash icon). That one issue stops being flagged. Dismissals are saved with the document and sync across your devices. If you edit that paragraph again later, Dabble re-checks it fresh.
- For spelling issues only, click Add to Dictionary (the book icon) to stop flagging that word everywhere.
Manage your dictionary
Section titled “Manage your dictionary”Your dictionary is the running list of words you’ve told Dabble to leave alone: character names, invented places, the spelling you swear is right. Every word you add with Add to Dictionary is saved there so Dabble stops flagging it.
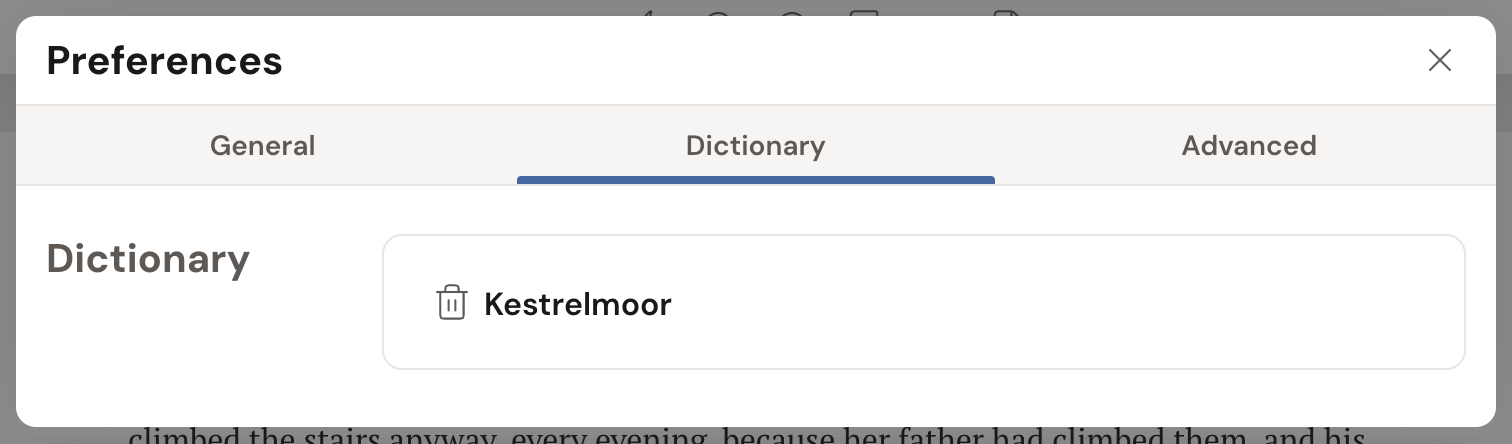
- Open Preferences, then open the Dictionary tab.
- You’ll see every word you’ve added. The empty state reads “No dictionary entries. Words you add to the dictionary will appear here.”
- To remove a word so Dabble flags it again, click the trash icon on its row.
Change the checking language
Section titled “Change the checking language”The checking language sets which spelling and grammar rules Dabble uses, and which Read to Me voices you get. It does not change the Thesaurus, which is English only. There are two places to set it: one project at a time, and an account-wide default.
Two language settings sit next to each other in Preferences, and they do different jobs. Writing Language is the language you write your book in, the one Dabble checks against. User Interface Language is the language Dabble’s own buttons and menus are in. Set one to French and the other to English if that’s how you work. See The Preferences window for the full tour.
For one project
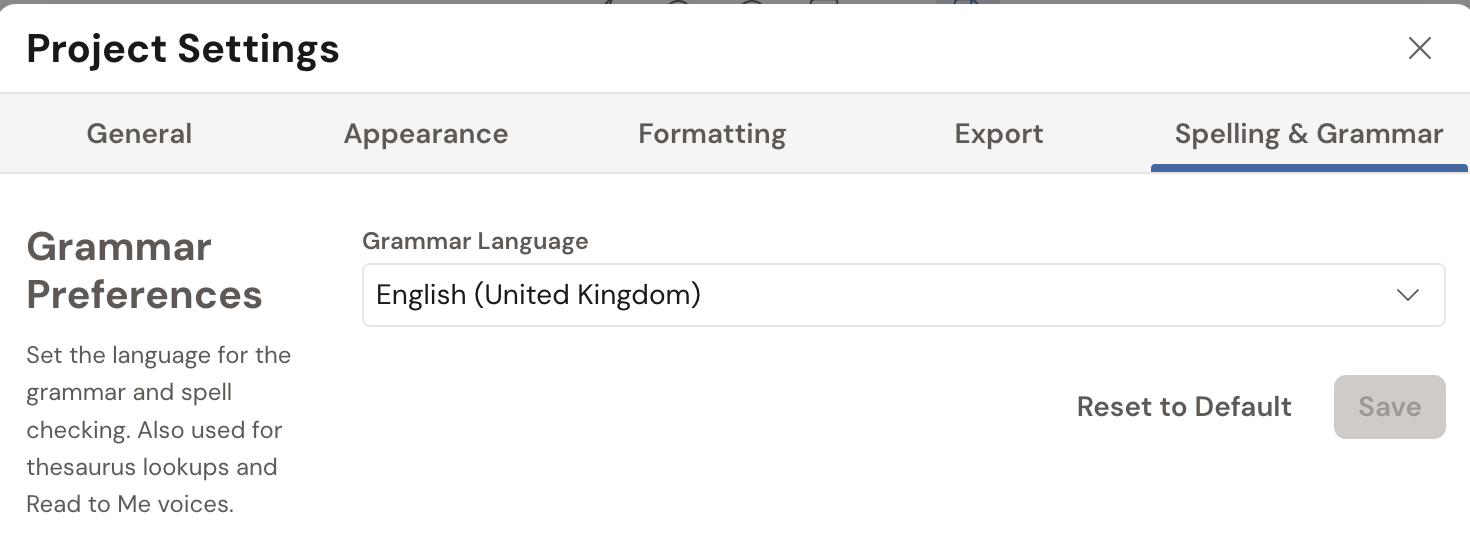
Section titled “For one project”- Open Project Settings and go to the Spelling & Grammar tab.
- Under Grammar Preferences, open the Grammar Language dropdown and pick a language. Pick anything but English and a note appears under the field about the Thesaurus.
- Click Save. A Saved confirmation appears.
- To clear this project’s language and follow your account default instead, click Reset to Default.
Your account-wide default
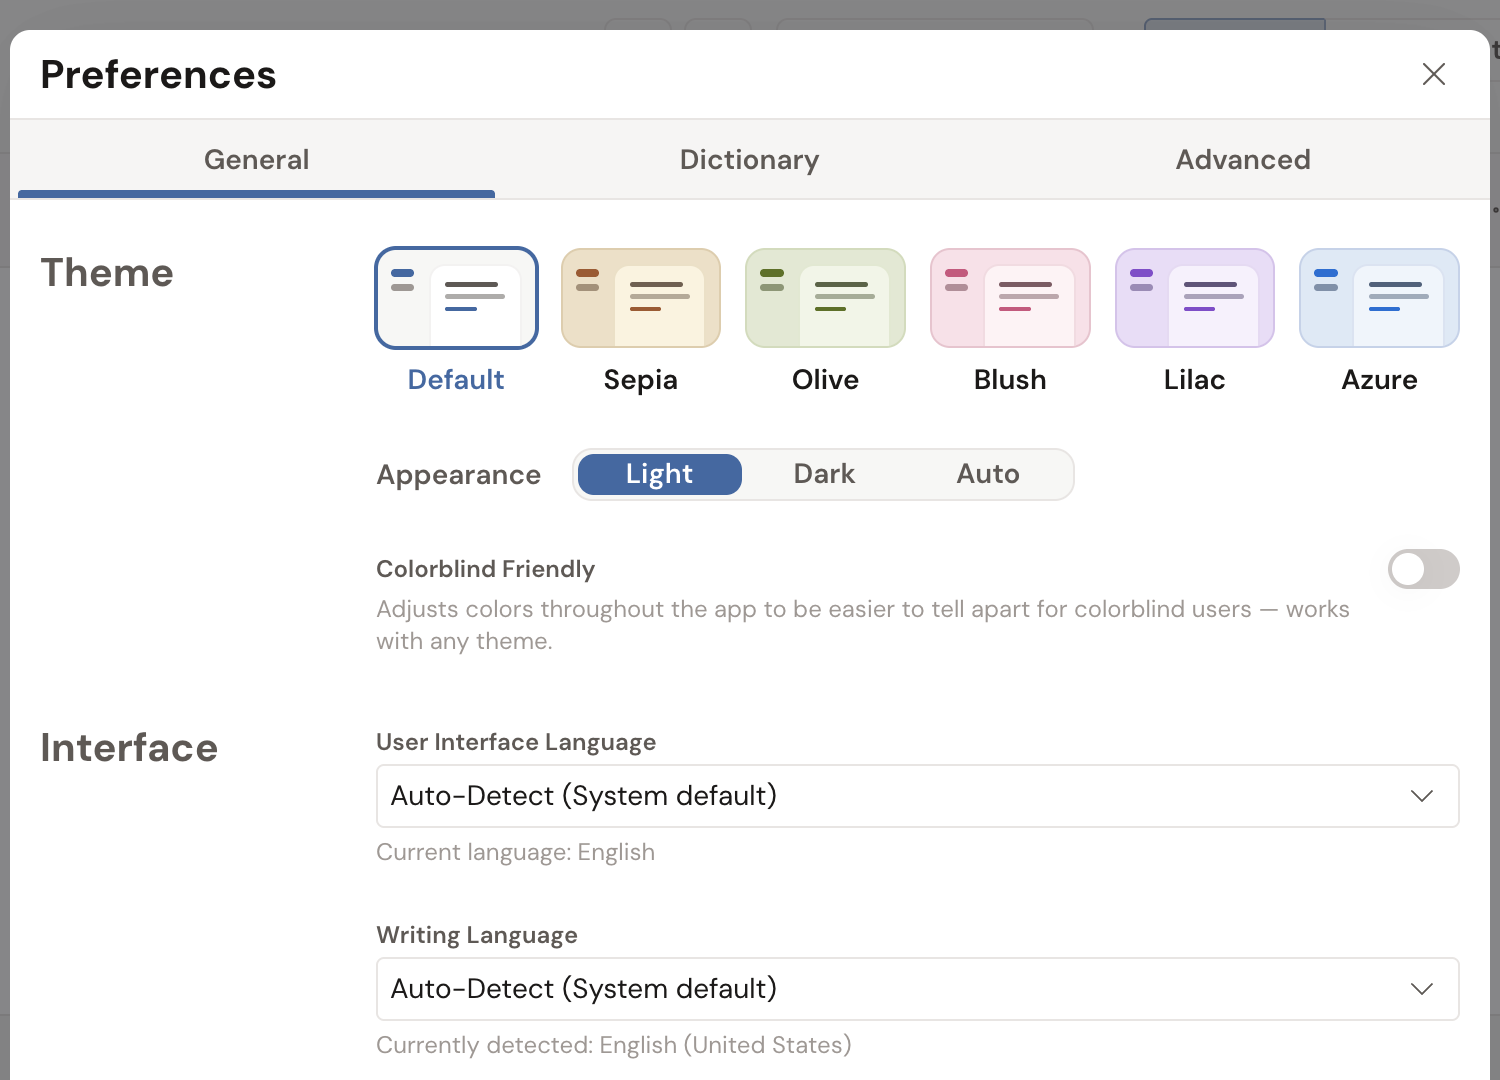
Section titled “Your account-wide default”- Open Preferences, go to the General tab, and find the Interface section.
- Just below User Interface Language, find Writing Language.
- Pick a language, or choose Auto-Detect (System default) to follow your system. While Auto-Detect is selected, a note below the field reads “Currently detected: {language}”.
- This default applies to every project that doesn’t have its own language set.
Apply your default to every project
Section titled “Apply your default to every project”Set your default, then notice some projects still check in the old language? They’re the ones with their own Grammar Language pinned in Project Settings. A pinned project ignores the account default until you clear it.
You can clear them all at once.
- In Preferences › General › Interface, look under the Writing Language field. When you own projects that pin their own language, a link appears reading Reset {count} project(s) to This Default.
- Click it. Dabble asks Apply Default to All Projects? and explains that this clears the language set on those projects so they follow your default writing language.
- Click Apply to All Projects to confirm, or Cancel to back out.
Only projects you own are affected. A project someone shared with you keeps its own language, because that setting belongs to everyone working in it.
Want just one project back on the default instead? Open its Spelling & Grammar tab and click Reset to Default.
- A per-project Grammar Language always wins over your account default.
- Three colors telling you nothing? Turn on Colorblind Friendly in Preferences › General, under Theme. The underlines stop relying on color alone: spelling stays wavy, grammar turns dotted, and style turns dashed. See Change your theme and fonts.
- Checks run only on the paragraphs you can see, and there’s a short pause after you type before underlines appear. Both are normal.
- Spell check works on single words, but grammar and style need a paragraph of at least two words to flag anything.
- Read-only views (such as version history previews or a merged review copy) don’t run checks.
Troubleshooting
Section titled “Troubleshooting”- You don’t see the Grammar menu item. Grammar and style are a paid feature. If Grammar is missing from View Options, it isn’t part of your current plan. Spell check is still free.
- Dabble asks about a grammar extension. If you’re running Grammarly or ProWritingAid as a browser extension while Dabble’s checking is on, Dabble shows Grammar extension detected once and recommends running only one checker at a time. Click Keep Dabble’s to keep using Dabble, or Disable Dabble’s to turn off Dabble’s spell check and grammar. (Desktop apps for those tools can’t be detected, only browser extensions.)
- An underline won’t go away. Click a suggestion to fix it, or Dismiss to leave it as is. Editing that paragraph later re-checks it from scratch.